Sunday, October 2, 2011

Gluten Free Carrot Cake Cookie Sandwiches


Ingredients:

  • 1 cup packed light-brown sugar
  • 1 cup granulated sugar
  • 1/2 pound (2 sticks) unsalted butter, room temperature
  • 2 large eggs, room temperature
  • 1 teaspoon pure vanilla extract
  • 2 cups gluten free cookie mix (see below)
  • 1 teaspoon baking soda
  • 1 teaspoon baking powder
  • 1/4 teaspoon salt
  • 1 teaspoon ground cinnamon
  • 1/2 teaspoon ground nutmeg
  • 1/2 teaspoon ground ginger
  • 2 cups old-fashioned rolled oats
  • 1 1/2 cups finely grated carrots, (about 3 large carrots)
  • 1 cup raisins
  • 1 cup of walnuts
  • Cream Cheese Frosting

*** My Gluten free mix is 3/4 C of All-purpose GF flour, 1/2 C of tapioca flour, and 1/2 C Rice flour, 1/4 C of potato starch****

    Directions:

    1 - Preheat oven to 350 degrees. Line two baking sheets with Silpat baking mats or parchment paper, and set aside. In the bowl of an electric mixer fitted with the paddle attachment, combine sugars and butter; beat until light and fluffy, 3 to 4 minutes. Add eggs and vanilla, and beat on medium speed until well combined.

    2 - In a large bowl, sift together flour, baking soda, baking powder, salt, cinnamon, nutmeg, and ginger; stir to combine. Gradually add flour to butter mixture; mix on a low speed until just blended. Mix in oats, carrots, and raisins. Chill dough in refrigerator until firm, at least 1 hour.

    3 - Using a 1/2-ounce ice-cream scoop, scoop dough onto prepared baking sheets, leaving 2 inches between cookies. Transfer to oven, and bake until browned and crisped, rotating pan halfway through baking to ensure even color, 12 to 15 minutes. Transfer to a wire rack to cool. Repeat baking process with remaining dough. Once cooled completely, use an offset spatula to spread about 2 teaspoons of cream-cheese filling onto a cookie. Sandwich together with a second cookie. Repeat with remaining cookies. Store in an airtight container for up to 3 days in the refrigerator.

    Cream Cheese Frosting

    Ingredients:

    • 8 ounces cream cheese, room temperature
    • 8 tablespoons (1 stick) unsalted butter, cut into pieces, room temperature
    • 1 cup confectioners’ sugar
    • 1 teaspoon pure vanilla extract

    Directions:

    Place cream cheese in a medium mixing bowl. Using a rubber spatula, soften cream cheese. Gradually add butter, and continue beating until smooth and well blended. Sift in confectioners’ sugar, and continue beating until smooth. Add vanilla, and stir to combine.

    Thursday, August 11, 2011

    Gluten Free Huckleberry Pie


    So funny story about this pie. I was at my sister-in laws house in Oregon and was in the mood to make a pie. She told me she had a couple bags of blueberries in the freezer so blueberry pie it was going to be. The first pie came and went exceedingly fast.
    Since the first pie was a hit, I was asked to make another pie. It was my father-in-law that pointed something out to me. He said, " you know these are huckleberries, not blueberries."
    What? Really? Are you sure?
    None of the previous pie eaters had known that. I thought they were smaller blueberries and maybe it was an organic Oregon thing.
    It turns out that someone had given my sister-in- law a bag of what she thought was blueberries and had stuck them in the refrigerator. Since blueberries and huckleberries are in the same family it was an easy mistake. So if you have either blueberries or huckleberries this recipe works for both.
    To read more on the blueberry vs. huckleberry you can click here: http://www.ehow.com/facts_5801920_difference-between-blueberries-huckleberries.html
    I managed to take a couple pictures of the second pie before it was gone.

    This recipe will give you 2 pie crusts.

    Pie Crust Ingredients:

    1 1/4 C of rice flour
    2/3 C of tapioca flour
    1/2 C of potato starch
    1/2 C of corn starch
    1/2 C coconut flour
    1/4 C of sweet rice flour
    1/2 tsp of xanthan gum
    1/8 tsp baking powder;
    1 tbsp sugar
    5 tbsp cold, unsalted butter, in small pieces
    5 tbsp shortening (butter flavored)
    1 egg, beaten;
    1 tbsp cold water;
    1 1/2 tsp cider vinegar.

    Directions:
    1. Combine flours, starches, xanthan gum, baking powder, and sugar.
    2. Cut in butter and shortening until pieces are the size of large peas.
    3. Combine egg, water and vinegar. Combine with dry mix.
    4. Form into a ball. Chill 1 hour. Divide dough in half. Refrigerate or freeze one portion for later use .
    5. Rolling out the dough can be a little hard. If you find your dough is sticking to the rolling pin or board, use a little GF flour ( I use Rice Flour) to keep for sticking. Also if the dough gets too soft just put it back in the refrigerator to harden up (about 20 minutes)
    6. Transfer dough to an 8 inch pie pan.
    If making unfilled crust, prick bottom and bake at 375 degrees for 12-15 minutes.

    Pie Filling:
    4 C of Huckleberries/Blueberries (which you have and/or prefer)
    3/4 C of sugar
    5 tbsp of cornstarch
    2 tbsp of lemon juice
    1/4 tsp of salt
    1/2 tsp of cinnamon


    Directions:
    1. Preheat oven to 375 degrees F .
    2. Mix sugar, cornstarch, salt, and cinnamon, and sprinkle over blueberries..
    3. Bake pie on lower shelf of oven for about 50 minutes, or until crust is golden brown.

    Let the pie cool for an hour before cutting into it. This give it time to thicken up.


    Bon Appetit.

    Wednesday, August 10, 2011

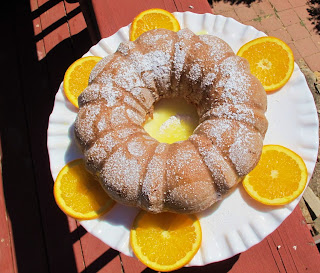
    Gluten Free Orange Bundt Cake


    I woke up this morning with these fierce desire to bake. I had no idea what to bake, only that I needed to bake something. The last time I baked was when I was in Oregon (which was about 3 weeks ago). While I was in Oregon I made Rice Krispy treats, Pecan Pie, Huckleberry pie, and Chocolate chip peanut butter cookies. Everything was of course Gluten free as my hubby's sister, some of her friends, and his mom are all gluten intolerant. I will post those recipes later but today I am craving something fresh and something with citrus. So the GF orange pound cake recipe is born. I had a package of Kinnikinnick's white cake mix so with a few tweeks this is the GF Orange pound cake.

    Ingredients for the pound cake:
    • Kinnikinnick White cake mix
    • 1 (3 ounce) of Vanilla instant pudding *
    • 3/4 C of Orange Juice
    • 1/2 C of Vegetable Oil
    • 4 eggs
    • Zest from 1 lemon
    • 1 tsp of Lemon Extract
    *** I used Jello instant vanilla pudding, my husband does not have a reaction to this so we use it. If you are more sensitive try Better Bowls Instant Pudding mix. You can find it on Amazon.***

    Cake topping:
  • 1/3 C of Orange Juice
  • 2/3 C of powdered Sugar
  • 1/2 tsp orange extract


    Directions:

    1. Pre-heat oven to 325 degrees
    2. Butter and flour ( I used sweet rice flour) your bundt pan
    3. Pour the cake mix and pudding in mixer. Use a spoon to mix well.
    4. Add the OJ, Eggs,lemon zest, and lemon extract.
    5. Mix on low until all blended and not lumpy (about 3 - 4 minutes)
    6. Pour into your prepared pan and bake for about 40-50 minutes
    7. Once cake is cooled and out of pan, combine your toppings all in a bowl and whisk to mix.
    8. I poked holes in my cake then drizzled the topping all over it and served.
    Bon Appetit.

    Tuesday, June 21, 2011

    Gluten Free Orange Chicken


    Sometimes you just crave certain food. Chinese food is one of those foods that my hubby craves. Since almost everything in Chinese food is covered with soy sauce (which is not gluten free) it is almost impossible to indulge in that craving.I have made GF Orange chicken before and he loves it. I have also used the same recipe and changed out the protein, instead of using chicken beef works just as well.


    .

    Ingredients

    • 1 1/2 pounds chicken breast cut into bite size pieces
    • 1/3 C white sugar
    • 1/3 C rice wine vinegar
    • 2 tbsp frozen orange juice concentrate
    • 1 tsp salt
    • 1 tsp Tamari
    • 1/4 C cornstarch
    • 2 tsp orange zest
    • 3 tablespoons grated fresh ginger
    • 1 1/2 tbsp minced garlic
    • C oil for frying

    Directions

    1. Lay the chicken out in a single layer on a baking sheet lined with paper towels. Allow to dry in the refrigerator for 30 minutes. In a small bowl, mix together the sugar, rice vinegar, orange juice concentrate, salt and tamari. Set aside
    2. .Heat oil in a wok over medium-high heat. Toss dried chicken in cornstarch to coat. Fry in the hot oil in small batches until crispy and golden brown; set aside.
    3. Drain all of the oil from the wok except about 1 tablespoon.Add orange zest, ginger and garlic to the remaining oil, and cook briefly until fragrant. Add the soy sauce mixture to the wok, bring to a boil, and cook until thick and syrupy, about 5 minutes. Add chicken, and heat through.

    I like to serve this with rice and either steamed broccoli or stir-fried broccoli.

    Bon Appetit.


    Wednesday, June 8, 2011

    Gluten Free Spaghetti Sauce with Meatballs.


    "When the moon hits you eye like a big pizza pie, that's amore.." I recently had a Lady and the Tramp moment with my puppies. I fed them 1 large noodle and they each gobbled a side until, viola! They kissed. It's the little silly things that make you smile in life. For my puppy love I had to go back to the Lady and the Tramp dinner classic. Spaghetti and meatballs (gluten free of course).
    When making this your entire house will smell of delicious Italian flavors and the neighbors will come knocking to see where the yummy smells are coming from.


    Ingredients:

    Sauce:
    • 1 C chopped onion
    • 5 cloves garlic, minced
    • 1/4 C olive oil
    • 2 (28 ounce) cans whole peeled tomatoes
    • 2 tsp salt
    • 1 tsp white sugar
    • 1 bay leaf
    • 1 (6 ounce) can tomato paste
    • 3/4 tsp dried basil
    • 1/2 tsp ground black pepper
    • 1/2 C good red wine (I used Graveyard Wnineries Cabernet Sauvignon. They are a local winery where I live and amazingly tasty)


    Meatballs:
    1 lb of ground beef (I used 85/15 beef from Trader Joes)
    1/2 lb of ground pork ( I had some left over sweet Italian sausage so I just took of the casing and used those)
    1 C of fresh GF bread crumbs **
    1 tbsp of dried parsley (fresh if you got it but dried is great too)
    1 tbsp of Parmesan cheese
    1/4 tsp of ground pepper
    1/4 tsp of garlic powder

    *** I keep a loaf of Kinnikinnick Gluten free tapioca bread in my freezer. I pulled out 3 pieces, put in the microwave for 1 minute, and then threw it in the food processor . Viola fresh gluten free breadcrumbs.***

    Directions:

    • In a large bowl, combine ground beef, pork, bread crumbs, parsley, Parmesan, 1/4 teaspoon black pepper, garlic powder and beaten egg. Mix well and form into 12 balls. Store, covered, in refrigerator until needed.
    • In a large saucepan over medium heat, saute onion and garlic in olive oil until onion is translucent. Stir in tomatoes, salt, sugar and bay leaf. Cover, reduce heat to low, and simmer 90 minutes. Stir in tomato paste, basil, 1/2 teaspoon pepper and meatballs and simmer 30 minutes more. Serve.

    Here is the link for Graveyard Winery in case you would like to try amazing wine.
    Bon Appetit.

    Monday, June 6, 2011

    Gluten Free Chicken Fingers/ Fried Chicken


    I grew up picnicing with my family on the weekends. My mom and grandma would pack up my brother and I and head off for our day adventure to a park, museum, or zoo. My mother would also always bring our own food because we were thrifty and because my mom is a great cook and baker.
    I figure it is time for my husband and I to start our own tradition but meld some of my old memories with our new experiences. For our first picnic outing I decided to tackle fried chicken.
    When I went to the store I accidentally grabbed chicken tenders so this is the gluten free attempt at chicken fingers (AKA fried chicken).

    Ingredients:
      2 C buttermilk (****you can use fresh but I found this powdered buttermilk in the baking isle of my grocery store that worked great.)
      • 1 tbsp Dijon mustard
      • 1 tsp salt
      • 1 tsp ground black pepper
      • 1 tsp cayenne pepper
      • chicken (I used chicken tenders and there were about 15 pieces)
      • 2 C Bobs all-purpose GF flour
      • 1 tablespoon baking powder
      • 1 tablespoon garlic powder
      • 1 tablespoon onion powder
      • 5 cups vegetable oil for frying

      • *** as I stated I used a powdered buttermilk that you only add water too to get the 2 C that you need. I figure who really keeps fresh buttermilk on hand all the time unless you make fresh butter like I occasionally like to do)

        1. Whisk together buttermilk, mustard, salt and pepper, and cayenne in a bowl, and pour into a resealable plastic bag. Add the chicken pieces, coat with the marinade, squeeze out excess air, and seal the bag. Marinate in the refrigerator anywhere from 2 to 8 hours (I had mine marinate for about 3 hours).
        2. When you are ready to cook the chicken, combine the GF flour, baking powder, garlic powder, and onion powder in the other plastic bag. Shake to mix thoroughly. Transfer one marinated chicken piece at a time into the dry ingredient bag, and shake well to ensure complete coverage. After all chicken pieces are coated, repeat the process by dipping them in the buttermilk marinade and shaking in the dry coating again.
        3. Heat oil in a large frying pan over medium-high heat, making sure not to burn the oil. When oil is hot, fry chicken in batches until golden brown and juices run clear, turning chicken to brown evenly.


        Bon Appetit
      .

      Wednesday, May 18, 2011

      Homemade Butter


      It was time to try this out. I have always wanted to make homemade butter but never actually made myself, until today. I had some heavy cream that I needed to use before it went sour (lovely I know).

      I am going to link a video that shows everything.
      The only change I did was I did not have manufacturers cream, I had heavy whipping cream.
      The process of getting to extract the buttermilk took a considerable amount of time.
      Much longer than the video says, I think it's because there is not as much fat in heavy cream like in manufactures cream so it just takes longer. Anyway, it took about 15 minutes before the buttermilk came out but everything else in the video worked perfect.

      **** make sure you put your shield up on your kitchen aid, it is a messy process otherwise.****

      Thursday, May 12, 2011

      Gluten Free Berry Cobbler (super easy)


      I have a plethora of fruit at my house right now. The weather is lovely here in California and that means lots of delicious berries for me to eat. The problem with all the lovely berries is that I can't eat them fast enough before the berries get close to spoiling. That is where today's recipe comes in to play. Cobblers are delicious, easy, and use my excess of berries. This recipe is so easy and simple it will not take you any time (I promise).

      Ingredients

      1 C of GF all purpose flour
      1 C of milk
      4 tbsp of butter
      3/4 C of sugar
      1 tsp of baking powder
      1/4 tsp of salt
      1/2 tsp of vanilla
      1/8 tsp of cinnamon
      2 1/2 to 3 C of fruit (I used blueberries and strawberries)
      1 tbsp of sugar

      • heat oven to 350 degrees.
      • Put butter in an 8-inch square or 9-inch round pan; set in oven to melt. When butter has melted, remove pan from oven.
      • Whisk flour, 3/4 cup of sugar, baking powder,cinnamon, and salt in small bowl. Add milk and vanilla; whisk to form a smooth batter. Pour batter into pan, then scatter fruit over batter.
      • Sprinkle with remaining 1 Tb. of sugar.
      • Bake until batter browns and fruit bubbles, 50 to 60 minutes. Serve warm or at room temperature with a dollop of whipped cream or a small scoop of vanilla ice cream, if desired.
      Bon Appetit.

      Friday, May 6, 2011

      Gluten Free Mocha cupcakes with Espresso Buttercream Frosting


      My husband loves coffee flavored anything. It seemed that the time has come for me to make a GF coffee dessert. I had Pamela's chocolate cake mix and thought I would play around with additional ingredients to kick it up a notch. I really like Pamela's cake mixes so far. The have all been a total win for me.

      Ingredients:

      • Pamela's GF Chocolate cake mix
      • 3 eggs
      • 1/2 C vegetable oil
      • 1 1/2 C of strong coffee (to which I added 4 1/2 tsp of instant espresso powder. Make sure its room temperature and not overly hot)

      Preheat oven to 350 degrees

      Mix all the items together. Be careful to not over mix. Pour batter into a pre-lined cupcake pan.
      Bake for about 15 - 20 minutes (depending on your oven)


      Espresso Frosting Ingredients:

      • 2 sticks of unsalted butter at room temperature
      • 2 1/2 C of powdered sugar
      • 1 1/2 tsp of vanilla
      • 1 1/2 tsp of instant espresso
      • 1 tsp of heavy whipping cream

      1. Mix the espresso powder into the vanilla until dissolved; set aside.

      2. Using the whisk attachment of a stand mixer, whip the butter on medium-high speed for 5 minutes, stopping once to scrape the sides of the bowl. Reduce the mixer speed to low and add the powdered sugar a little at a time, waiting until it is mostly incorporated before adding more. Once all of the powdered sugar has been added, scrape the sides of the bowl and increase the speed to medium-high and whip until fluffy, about a minute or two. Add the espresso and vanilla mixture and continue to mix at medium-high until it is completely incorporated, scraping the sides as necessary. Add the heavy whipping cream and mix at medium-high for a minute.


      Bon Appetit

      Gluten Free Granola Time.


      Tomorrow we have a picnic to go to in Golden Gate park in San Francisco so lots of food needs to be made. First off it's GF Granola. This is my first attempt so (fingers crossed) I was happy how it came out. I played around with different concoctions and this is the winner. I have to say I really like this recipe. No more store bought granola for this girl.


      Ingredients:

      • 4 C of oats (please make sure they are certified gluten-free)
      • 2 ½ C coarsely chopped walnuts
      • 2 C of sweetened coconut
      • 1 cup pistachios
      • 3 Tbsp of Flaxseed meal
      • 2 tsp cinnamon
      • 1 tsp kosher salt
      • 3/4 C of vegetable oil
      • ½ C of honey
      • 3 C (or so) mixed dried fruit (I used cranberries, sour cherries, and golden raisins here)

      Preheat the oven to 350°.

      Mix together the oats, walnuts, pistachios, coconut and flaxseed meal. Make sure you use a large baking sheet or roasting pan for this. (I prefer the roasting pan, because you can really swirl around those ingredients without spilling them on the floor.)

      In a stove top pan mix the oil, cinnamon, salt, and honey. (If you measure out the oil in a measuring cup and reuse that same cup to measure the honey, your honey will not stick and it makes cleanup a heck of a lot better). I just heated the pan until my honey was dissolved into the oil.

      Drizzle the mixture evenly over the surface of the oats mixture.. Stir it all up until everything is well coated — not too sticky, but not dry either. Done? Great. Throw it in the oven.

      Bake for 45 minutes, stirring every 15 minutes or so just to make sure that the coconut doesn’t burn.. Repeat this process three more times (it could twice or four times for you, depending on your oven). You’re looking for the granola to be not-at-all wet, golden brown. crunch.

      Remove the granola from the oven and allow to cool (this is when it will crisp up), stirring occasionally. Add the dried fruit mixture.

      Store the cooled granola in an airtight container


      ***this granola recipe is not the type of granola that is hard in chunks. For that you probably want to add more sugar (maple syrup & or brown sugar) if that is the type of granola you want. I wanted a little more healthy type of granola*****.

      Thursday, May 5, 2011

      Homemade Sweet and Sour Mix and Margaritas!


      Today is Cinco de Mayo and what better way to celebrate but with chips and salsa, guacamole, and margaritas.
      Margaritas are one of my favorite drinks. Unfortunately I usually do not indulge in them often because the sweet and sour mix most places use is too acidic for my tummy.
      So naturally the solution is to make my own and experiment. I made a Cadillac margarita, which just means that an addition of a Grand Marnier floater (shot poured on top of the drink) to the traditional margarita.

      To make the sweet and sour mix

      • 1 C of lemon juice (it was about 5 lemons)
      • 1 C of lime juice (about 6 limes, depending on how juicy the lime)
      • 1 1/2 C of water
      • 1 1/2 C of sugar

      Combine water and sugar in large saucepan. Stir over medium heat until sugar dissolves. Bring to boil. Cool syrup.

      Mix syrup, lemon juice and lime juice in pitcher. Chill until cold. (Can be made 1 week ahead. Cover; keep chilled)


      My recipe for 1 glass of yummy margarita is the following:

      • 3 shots of sweet and sour mix
      • 1 1/2 shots of Patron silver tequila
      • 1 1/2 shots of Grand Marnier
      The picture I took is after I mixed the margarita and had some sample tastes. Hey I had to make sure it tasted good and YES it did!
      Oh and I don't own margarita glasses so a pint glass works just as well.